gvcourse

Welcome to the SwiftUI tutorial! In this guide, we’ll dive into the world of SwiftUI, Apple’s modern UI framework, as we embark on the journey to build a comprehensive application—GVCourse.
Table of Contents
- Overview
- Getting Started
- Step-by-Step Instructions
- See Also
- Conclusion
- License
Overview
What is SwiftUI?
SwiftUI is a declarative UI framework built with the Swift programming language. While SwiftUI is a relatively new framework, it is built on top of Swift, which has been around for a while. If you are new to Swift, consider going through the official Swift tutorials to get familiar with the basics.
Why SwiftUI?
SwiftUI is a powerful framework that allows developers to build sophisticated and visually appealing user interfaces with significantly less boilerplate code. SwiftUI’s declarative syntax empowers developers to focus on the what rather than the how of UI creation, fostering a more user-friendly and efficient approach to UI development. SwiftUI also offers a wide range of features such as data binding, seamless integration, and cross-platform capabilities that make it a great choice for building modern applications. From my experience with other UI frameworks, I find SwiftUI to be quite intuitive and easy to use. I hope that you will find it to be the same.
GVCourse App
GVCourse serves as a centralized hub for exploring all the courses and information offered by Grand Valley State University. The motivation behind developing the GVCourse application stems from the observation that, at Grand Valley State University school of Computing, the dissemination of information about new courses often relies on social platforms like Discord or email. While these methods are effective, occasional oversight occurs as Discord messages may go unnoticed, and a barrage of emails can lead to missed announcements. In response, GVCourse offers a streamlined solution, providing users with a centralized platform to access information about both new and existing courses.
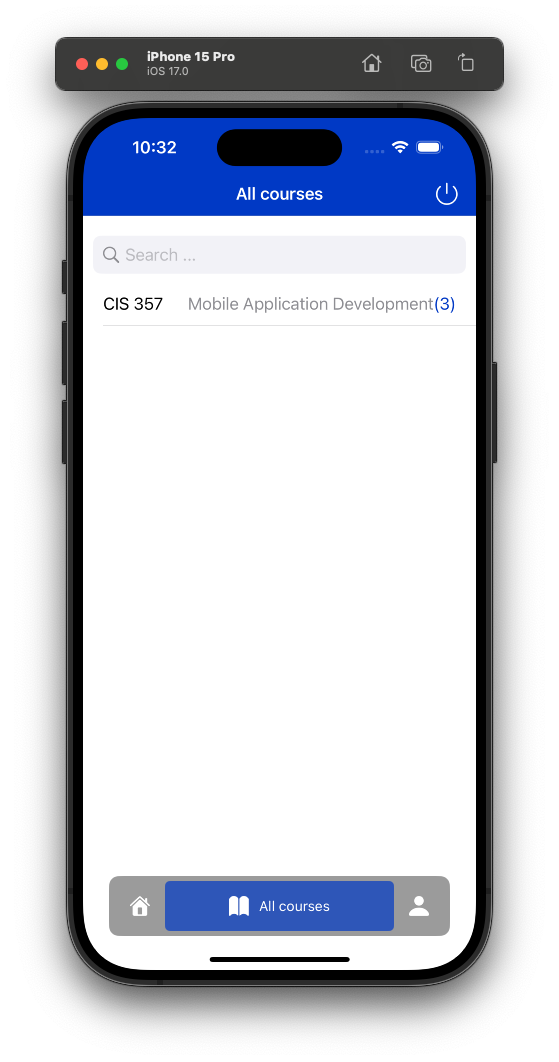
Course Catalog with Search and Filter
The course catalog is a list of courses offered by Grand Valley State University that users can search and filter. When users type in the search bar, the list is updated in real-time to display courses that match the search query. User can explore details about a course by tapping on the card.
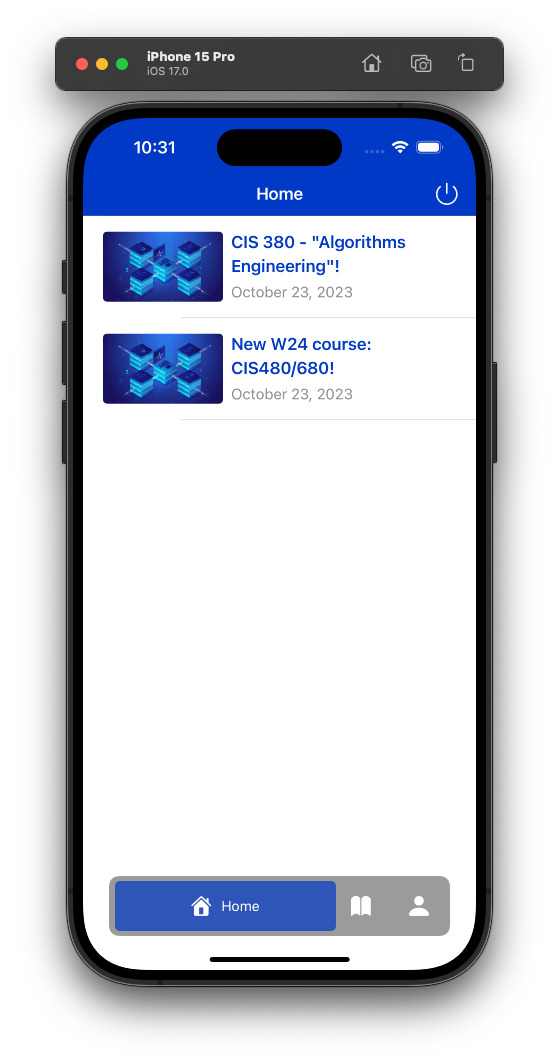
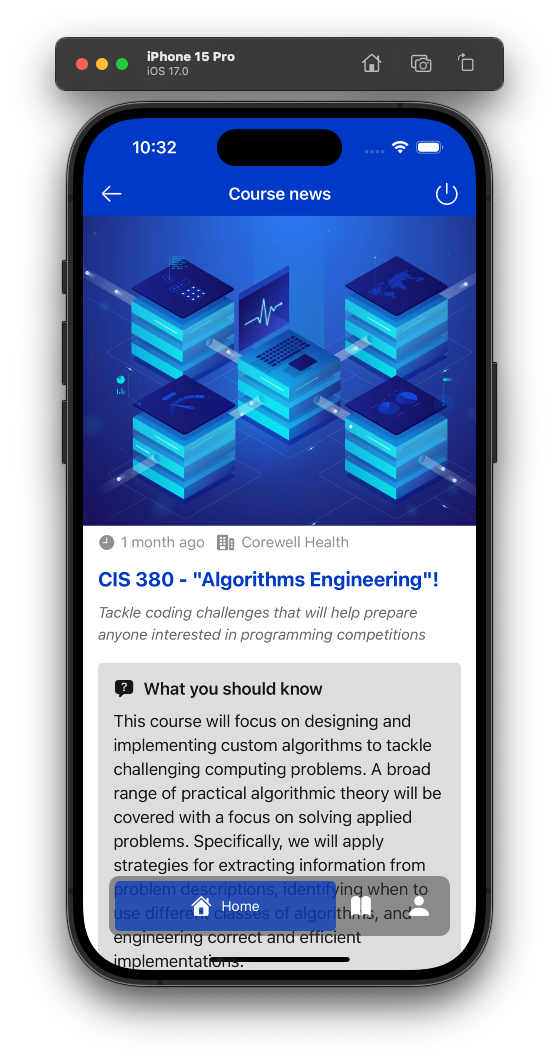
Course News and Announcements
Every information relating to course (new courses, course changes, etc.) is displayed in the course news and announcements section. The course news and announcements section is updated in real-time, ensuring that users are always up to date with the latest information. Users can read the full article by tapping on the card. Here is also the place to present posters for new courses.
Authentication
The authentication feature allows users to create accounts and log in using third-party authentication services like Google. Users can also log out of their accounts.
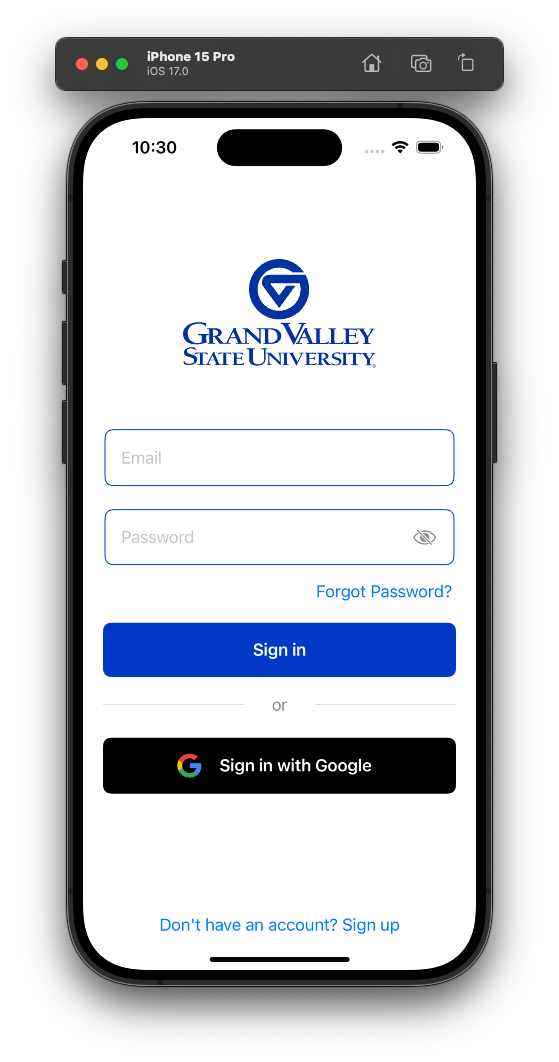
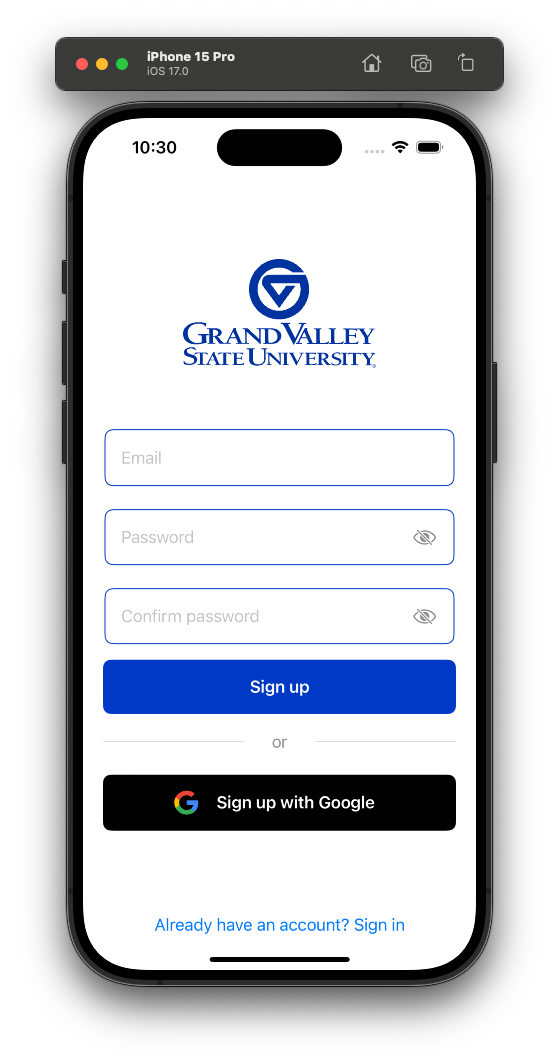
GVCourse App Screenshots
Authentication
| Sign In | Sign Up |
|---|---|
 |
 |
Course News and Announcements
| News List | News Details |
|---|---|
 |
 |
Course Catalog
| Courses List | Course Details |
|---|---|
 |
 |
Settings

Demo Video:
https://github.com/minhtran241/gvcourse/assets/98200886/21a407cf-9d93-47dd-b627-b46187c47ac8
Why GVCourse is a Great Example of a SwiftUI App?
GVCourse utilizes many of SwiftUI’s features to create a seamless user experience. For example, the course catalog is a list of courses that users can search and filter. SwiftUI’s data binding feature allows us to update the list in real-time as users type in the search bar. SwiftUI also offers a wide range of UI components that we can use to build the GVCourse app. For example, we can use the List component to display the course catalog.
Throughout the tutorial, we’ll leverage SwiftUI’s powerful features such as declarative UI, data binding, and seamless integration to bring the GVCourse app to life. Screenshots and code snippets will be seamlessly integrated to enhance your understanding of the app’s functionality, making this tutorial an immersive learning experience.
Getting Started
Before we begin building our GVCourse app, let’s ensure your development environment is set up correctly.
Software Requirements
macOS
SwiftUI requires macOS 10.15 Catalina or later. To check your macOS version, click the Apple icon in the top left corner of your screen and select About This Mac.

Xcode and Simulator
Install the latest version of Xcode from the Mac App Store.
Simulator is a tool that allows you to run your app on a virtual device. To open Simulator, open Xcode and select Xcode > Open Developer Tool > Simulator.
![]()

SF Symbols
SF Symbols is a set of over 3,100 symbols that you can use in your app. To install SF Symbols, open Xcode and select File > Swift Packages > Add Package Dependency. In the search bar, type “SF Symbols” and click Next. Select the latest version and click Next. Finally, click Finish.
![]()
In this tutorial, we will use SF Symbols to display icons in our app. For example, we will use the following code snippet to display a user icon:
Image(systemName: "person.circle")
Step-by-Step Instructions
Now that your environment is set up, let’s take a look at SwiftUI’s basic concepts that I found essential in learning SwiftUI. The following sections will guide you through the process with code snippets, explanations, and visual aids. We will also use these concepts to build the GVCourse app. Let’s get started!
Main components
There are three main components in SwiftUI: Views, Modifiers and Data flow. Let’s explore each component in more detail.
Views
Views layout in SwiftUI is based on a tree of view components. Each view component is responsible for displaying a part of the UI.
View protocol
Views are the building blocks of your app’s UI. In SwiftUI, a view is a struct that conforms to the View protocol. For example, the following code snippet defines a view that displays a text:
struct CourseRowView: View {
    // Properties declaration goes here...

    var body: some View {
  // View body goes here...
  Text("Course Row View")
    }
}
HSack, VStack and ZStack
One of the most common concepts in SwiftUI is HStack, VStack and ZStack. So let’s explore them in more detail.
HStack: HStack is a view container that arranges its child views in a horizontal line
HStack {
    Text(name).foregroundStyle(.black)
    Text(title).foregroundStyle(.gray)
}
As you can see in the code snippet above, we use HStack to arrange the course name and course title in a horizontal line. We can also group multiple views together using Group:
HStack {
    Text(name).foregroundStyle(.black)
    Group {
        Text(title).foregroundStyle(.gray) +
        Text("(\(credits))").foregroundColor(Color(.brandPrimary))
    }
}
VStack: VStack is a view container that arranges its child views in a vertical line
VStack(alignment: .leading, spacing: 5) {
    Text(news.title!)
    Text(news.createdAt!, style: .date)
}
As you can see in the code snippet above, we use VStack to arrange the news title and news creation date in a vertical line.
ZStack: ZStack is a view container that arranges its child views in a Z-axis, which means the views are stacked on top of each other.
ZStack {
 Image(uiImage: UIImage(data: news.image!)!)
  .resizable()
  .aspectRatio(contentMode: .fill)
  .frame(width: 100, height: 100)
  .cornerRadius(10)
 Text(news.title!)
  .font(.title3)
  .fontWeight(.bold)
  .foregroundColor(.white)
}
As you can see in the code snippet above, we use ZStack to stack the news image and news title on top of each other.
We can also use one of the view containers inside another view container, for example, we can use VStack inside HStack:
HStack {
 VStack(alignment: .leading, spacing: 5) {
  Text(news.title!)
  Text(news.createdAt!, style: .date)
 }
 Spacer()
 Image(uiImage: UIImage(data: news.image!)!)
  .resizable()
  .aspectRatio(contentMode: .fill)
  .frame(width: 100, height: 100)
  .cornerRadius(10)
}
Modifiers
In SwiftUI, we can use modifiers to style the views. For example, we can use foregroundStyle to change the text color:
Text(name).foregroundStyle(.black)
We also can chain multiple modifiers together:
Text(title).foregroundStyle(.gray).font(.title3)
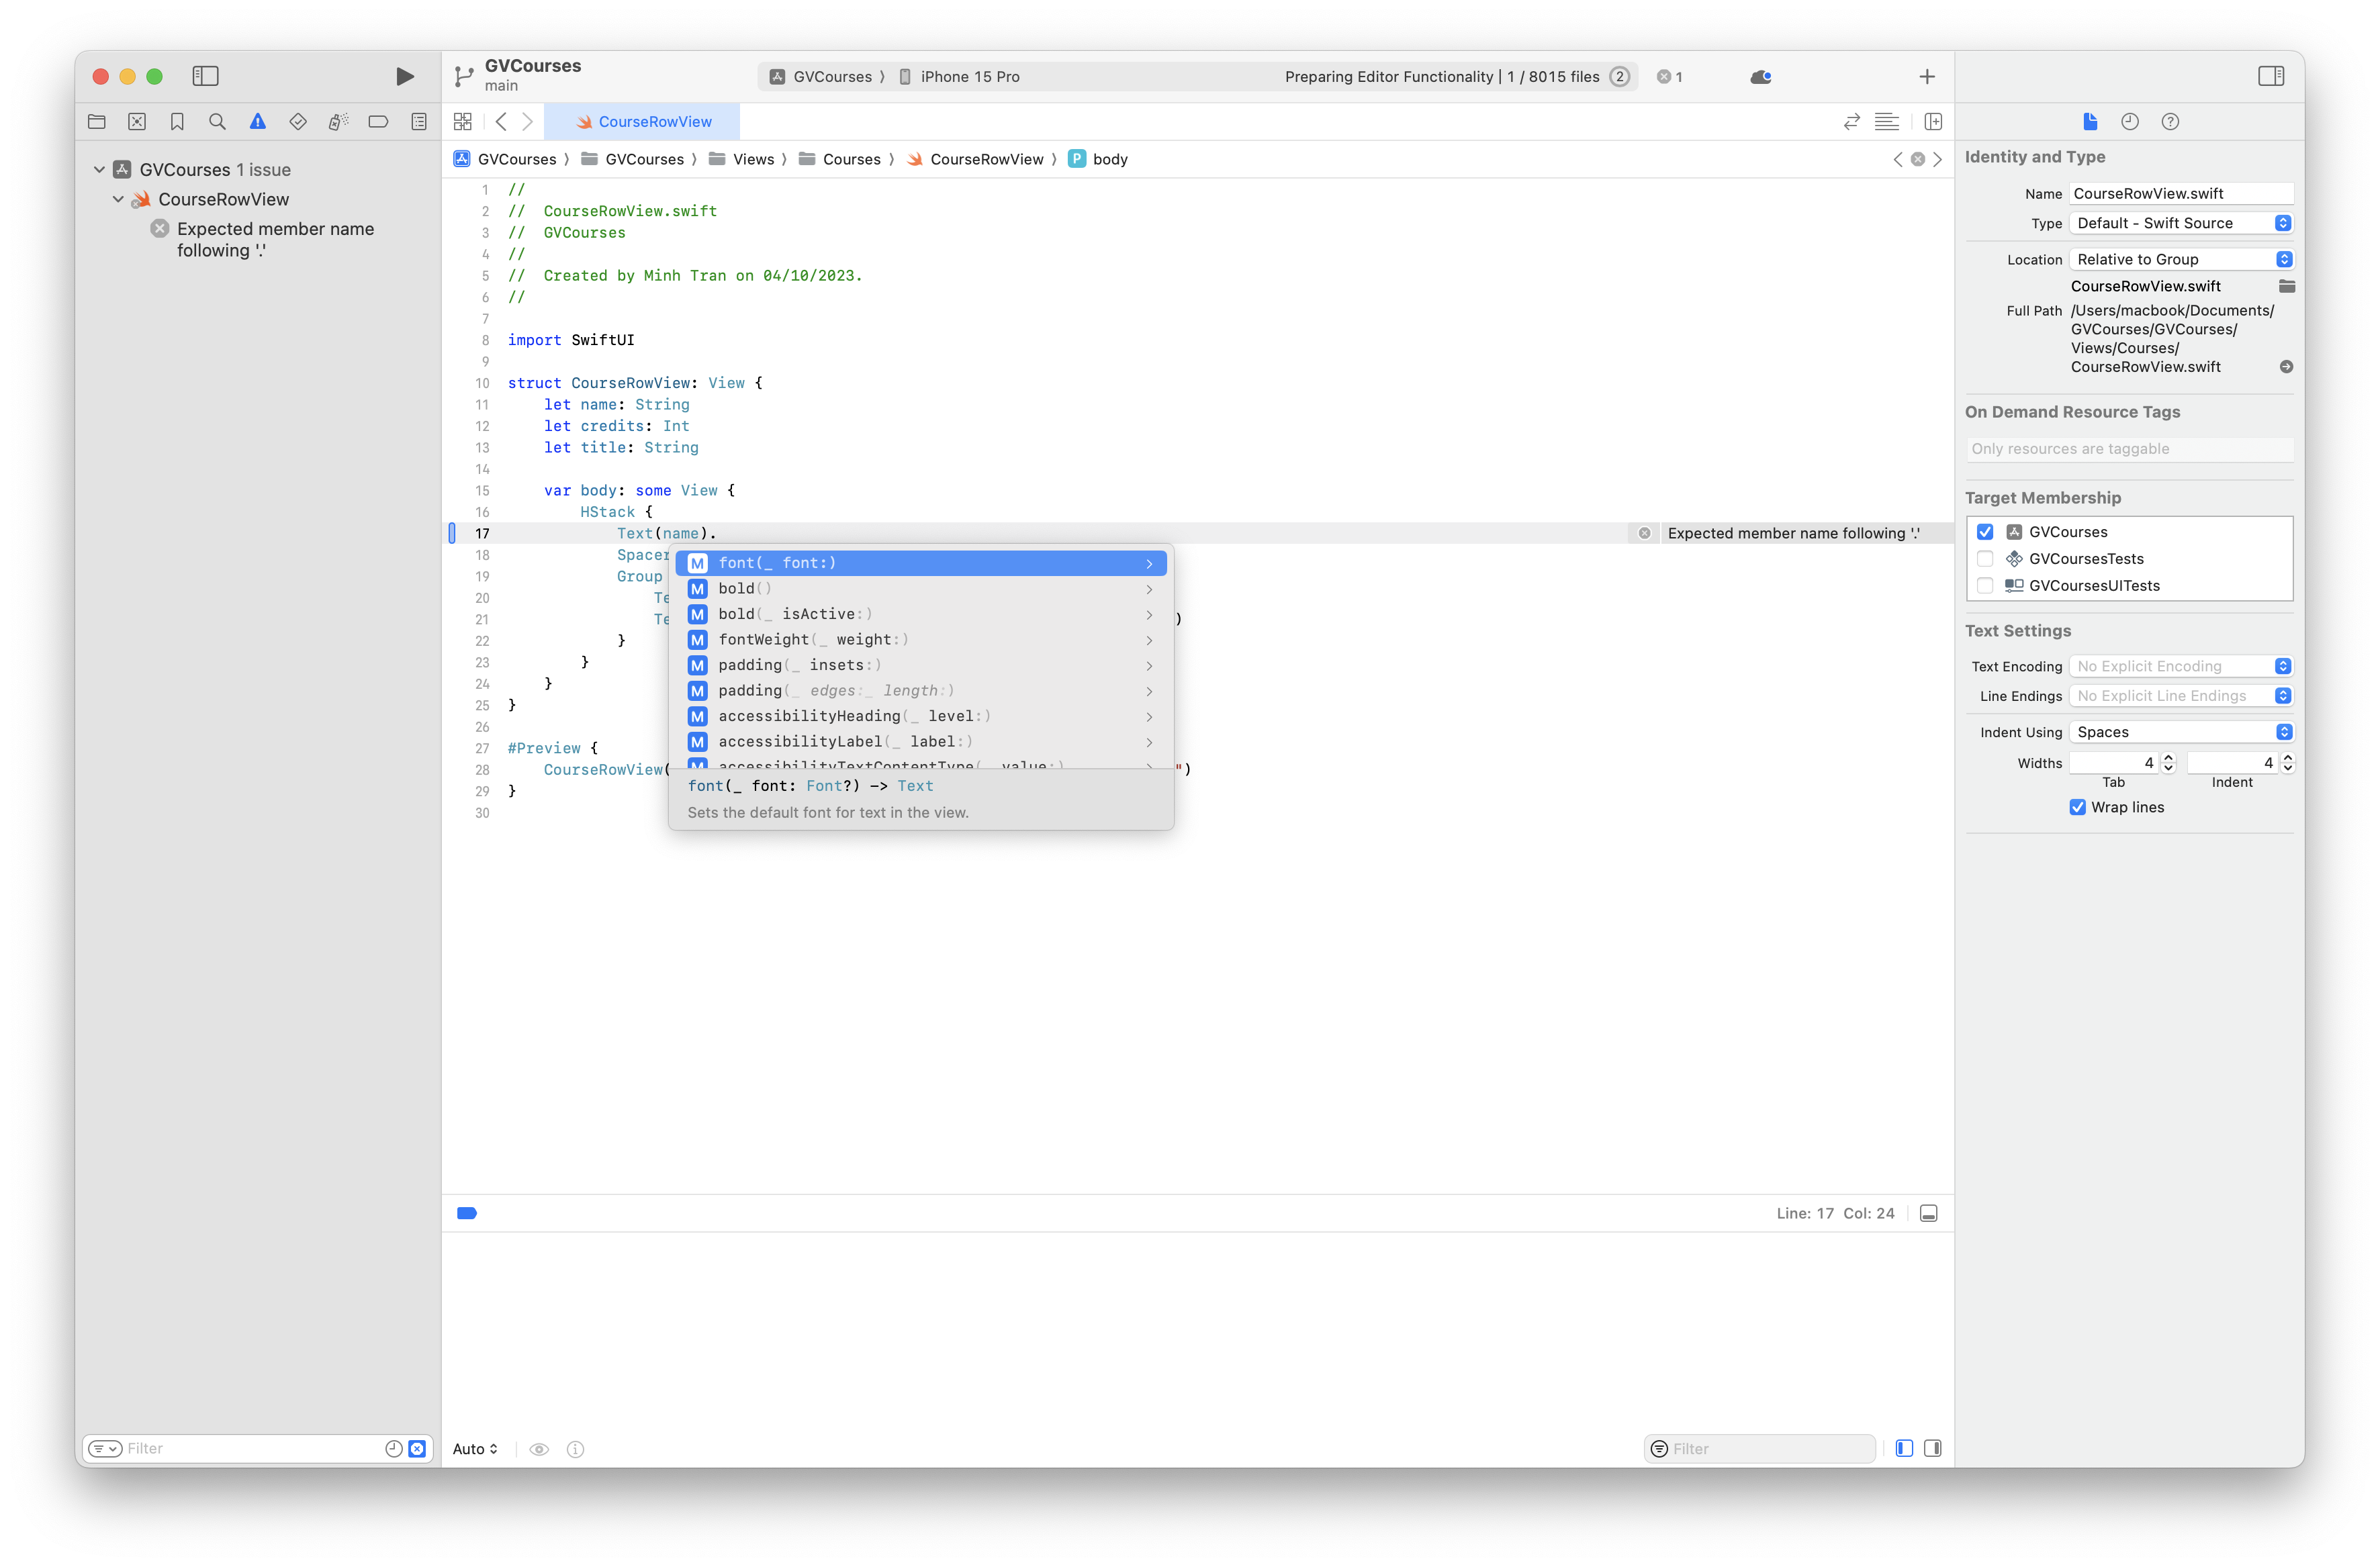
In order to know what modifiers are available for a view, we can use Xcode’s code completion feature. For example, if we want to know what modifiers are available for Text view, we can type “Text.” and Xcode will show a list of available modifiers:
Data flow
The data flow in SwiftUI is unidirectional, which means the data flows from the parent view to the child view. The parent view is responsible for passing the data to the child view. For example, the following code snippet defines a view tree with a root view and two child views:
struct CourseRowView: View {
 @State var name: String = ""
 @State var title: String = ""

 var body: some View {
  VStack(alignment: .leading, spacing: 5) {
   Text(name).foregroundStyle(.black)
   Text(title).foregroundStyle(.gray)
  }
 }
}
As you can see in the code snippet above, we use VStack to group two Text views together. The VStack is the parent view and the two Text views are the child views. The VStack is responsible for arranging the two Text views in a vertical line. The VStack is also responsible for passing the data to the child views.
We can use state to store the state of a view. The concept of state in SwiftUI is quite similar to the concept of state in React. For example, we can use @State to store the state of a text field:
@State var name: String = ""
Property wrappers
In SwiftUI, we can use property wrappers to store the state of a view. There are many property wrappers available in SwiftUI, in this tutorial, we will use @State, @Binding, @EnvironmentObject and @Published and they are also the most essential property wrappers in SwiftUI. Let’s explore when to use each property wrapper:
@State: when your view needs to mutate one of its own properties.
@State var name: String = ""
@Binding: when your view needs to mutate a property owned by an ancestor view, or owned by an observable object that an ancestor has a reference to, you should use @Binding. For example, we can use @Binding to bind the state of a boolean to a variable:
@Binding var isBeingPresented: Bool
@EnvironmentObject: when it would be too cumbersome to pass an observable object through all the initializers of all your view’s ancestors. For example, we can use @EnvironmentObject to pass the CourseStore to all the views:
@EnvironmentObject var store: CourseStore
@Published: when you want to observe changes to a property of an observable object.
@Published var courseList: [Course] = []
Following the undirectional data flow, SwiftUI can maintain clear and consistent data flow throughout the app. I think this is one of the most important concepts in SwiftUI, so make sure you understand it well.
That’s it for all the basic concepts in SwiftUI that we will use in this tutorial to build the GVCourse app. If you want to learn more about SwiftUI, you can check out the official SwiftUI documentation. Apple also provides a great tutorial to get started with SwiftUI. Now let’s start building the GVCourse app!
Setting Up the Project
-
Open Xcode and create a new SwiftUI project named “GVCourse”, please make sure to select “SwiftUI” as the user interface and “SwiftUI App” as the life cycle.
-
You can run the app by clicking the play button in the top left corner of Xcode’s toolbar. If everything is set up correctly, you should see a blank screen with the text “Hello, world!”.
Building the Views
The views are responsible for displaying the app’s content and handling user interactions. In this section, we will explore how to build the views for GVCourse. We will start with the Course component, which is responsible for displaying the course catalog.
Create views
Create view for a single object showing in a list
Create a new SwiftUI file named CourseRowView.swift and add the following code, which defines the View for a single course row, we will use struct to define the view in SwiftUI because struct is immutable and it is easy to maintain the state of the view.
import SwiftUI

struct CourseRowView: View {
    let name: String
    let credits: Int
    let title: String

    var body: some View {
        HStack {
            Text(name).foregroundStyle(.black)
            Spacer()
            Group {
                Text(title).foregroundStyle(.gray) +
                Text("(\(credits))").foregroundColor(Color(.brandPrimary))
            }
        }
    }
}
As you can see in the code snippet above, we use HStack to arrange the course name and course title in a horizontal line. Here is the result:

Create view for a list of objects
Create a new SwiftUI file named CourseListView.swift and add the following code, which defines the View for the course list.
struct CoursesListView: View {
 var courses: [Course] = []
    var body: some View {
        List {
                ForEach(courses) {c in
                    CourseRowView(name: c.name!, credits: c.credits!, title: c.title!)
                }
            }
            .listStyle(InsetListStyle())
            .padding(.bottom, 80)
        }
}
Create view for a single object showing in a detail view
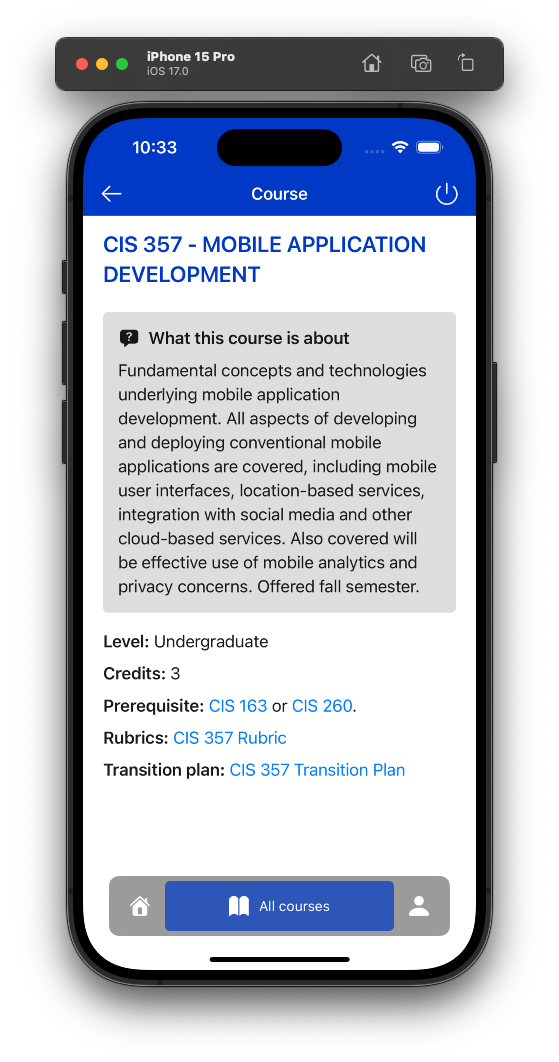
Create a new SwiftUI file named “CourseDetailsView” and add the following code. This view will display the properties of a course. We will use ScrollView to make the view scrollable.
struct CourseDetailsView: View {

    @Environment(\.presentationMode) var presentation
    var course: Course

    var body: some View {
        ZStack {
            ScrollView {
                VStack {
                    VStack {
                        HStack {
                            Text("\(course.name!.uppercased()) - \(course.title!.uppercased())")
                                .font(.title2)
                                .fontWeight(.semibold)
                                .foregroundColor(Color("brandPrimary"))
                                .lineLimit(3)
                                .padding(.vertical, 15)
                            Spacer()
                        }
                        .frame(maxWidth: .infinity)

                        CustomTextBox(systemSymbol: "questionmark.bubble.fill", title: "What this course is about", textBody: course.description!)

                        HStack {
                            Text("**Level:** \(course.level ?? "Undergraduate")")
                                .multilineTextAlignment(.leading)
                                .font(.body)
                                .foregroundColor(Color.primary.opacity(0.9))
                                .padding(.bottom, 2)
                            Spacer()
                        }.frame(maxWidth: .infinity)

                        HStack {
                            Text("**Credits:** \(course.credits ?? 3)")
                                .multilineTextAlignment(.leading)
                                .font(.body)
                                .foregroundColor(Color.primary.opacity(0.9))
                                .padding(.bottom, 2)
                            Spacer()
                        }.frame(maxWidth: .infinity)

                        if (course.prerequisiteString ?? "").isEmpty == false {
                            HStack {
                                Text("**Prerequisite:** \(course.prerequisiteString!.toMarkdown())")
                                    .multilineTextAlignment(.leading)
                                    .font(.body)
                                    .foregroundColor(Color.primary.opacity(0.9))
                                    .padding(.bottom, 2)
                                Spacer()
                            }.frame(maxWidth: .infinity)
                        }
                        // ... more properties
                    }
                }
            }
        }
    }
}
Here is the result:

Custom view components (subviews)
You may notice that we use a custom view called CustomTextBox in the code snippet above. Yes, we can create our own custom view in SwiftUI, all the custom views are defined in the Custom folder. Let’s create a new SwiftUI file named CustomTextBox.swift and add the following code:
struct CustomTextBox: View {

    var systemSymbol: String
    var title: String
    var textBody: String

    var body: some View {
        VStack(spacing: 10) {
            HStack {
                Image(systemName: systemSymbol)
                Text("**\(title)**")
                Spacer()
            }
            Text(textBody)
        }
        .multilineTextAlignment(.leading)
        .font(.body)
        .foregroundColor(Color.primary.opacity(0.9))
        .padding(15)
        .background(
            Color.gray.opacity(0.3)
        )
        .cornerRadius(5)
        .padding(.bottom, 10)
        .frame(maxWidth: .infinity)
    }
}
With just a few lines of code, we have created a beautiful custom view. Here is the result:

That’s it, we have finished building the views for Course component. All the code for views is located in the Views folder. Now, let’s explore how to build the model for the Course component.
Building the Models
In this app, the each model contains data object type of specific component. For example, the Course model contains data object type of Course component. In this section, we will explore how to build the models for GVCourse. We will start with the Course model. First, let’s create a Models folder and a new Swift file named Course.swift inside the Models folder. Our Course model will have the following properties:
struct Course: Identifiable {
    let id: String?
    let number: Int?
    let subject: String?
    let name: String?
    let title: String?
    let description: String?
    let credits: Int?
    let rubricsUrl: String?
    let level: String?
    let transitionPlanUrl: String?
    let prerequisiteString: String?
    let createdAt: Date?

    init() {
        self.id = nil
        self.number = nil
        self.subject = nil
        self.name = nil
        self.title = nil
        self.description = nil
        self.credits = nil
        self.rubricsUrl = nil
        self.level = nil
        self.transitionPlanUrl = nil
        self.prerequisiteString = nil
        self.createdAt = nil
    }

    init(id: String, number: Int, subject: String, name: String, title: String, description: String, credits: Int, rubricsUrl: String?, level: String, transitionPlanUrl: String?, prerequisiteString: String?, createdAt: Date) {
        self.id = id
        self.number = number
        self.subject = subject.uppercased()
        self.name = name
        self.title = title
        self.description = description
        self.credits = credits
        self.rubricsUrl = rubricsUrl
        self.level = level.capitalized
        self.transitionPlanUrl = transitionPlanUrl
        self.prerequisiteString = prerequisiteString
        self.createdAt = createdAt
    }
}
You may notice that we use Identifiable protocol in the code snippet above. Identifiable protocol is used to identify a model, it requires the model to have a property named “id” and the type of the property must be String. In our case, we use the course id as the id property.
Basically, we define a Course struct with all the properties we need, and we define two initializers for the Course struct, one is the default initializer and the other one is the custom initializer. You can apply the same approach to build other models. All the code for models is located in the Models
Interacting with Database
In this section, we will explore how to interact with the database. We will use Firebase Firestore as the database for GVCourse. If you are not familiar with Firebase Firestore, you can check out the official documentation to learn more about it. In SwiftUI, the way to connect with Firebase Firestore is the same as using normal Swift, so you can follow the official documentation to set up Firebase Firestore.
Implementing stores
The Stores folder contains ObservableObject that can also be used globally as an EnvironmentObject. This is where we will implement the logic to fetch data from the database. First, let’s create a new folder named “Stores” and a new Swift file named CourseStore.swift inside the Stores folder. This class will provide methods to fetch data from the database. Add the following code to the file:
import SwiftUI
import FirebaseFirestore

class CourseStore: ObservableObject {

    private let db: Firestore
    private var ref: CollectionReference?
    private var listener: ListenerRegistration?
    @Published var courseList: [Course] = []

    init() {
        self.db = Firestore.firestore()
        self.ref = self.db.collection("courses")
        self.registerForFirebaseUpdates()
    }
In order to listen to the database update, we need to register for it:
private func registerForFirebaseUpdates() {
        self.listener = self.ref?.addSnapshotListener { (snapshot, error) in
            guard let documents = snapshot?.documents else {
                // handle error
                return
            }

            // Update the @State variable on the main thread
            DispatchQueue.main.async {
                self.courseList = documents.compactMap { document in
                    return self.parseCourseDocument(document)
                }.sorted(by: { $0.name! > $1.name! } )
            }
        }
    }
After getting records from the database, we need to parse the records to the Course model:
func parseCourseDocument(_ document: QueryDocumentSnapshot) -> Course? {
        let data = document.data()

        guard let id = document.documentID as? String,
              let number = data["number"] as? Int,
              let subject = data["subject"] as? String,
              let name = data["name"] as? String,
              let title = data["title"] as? String,
              let description = data["description"] as? String,
              let credits = data["credits"] as? Int,
              let rubricsUrl = data["rubricsUrl"] as? String,
              let level = data["level"] as? String,
              let transitionPlanUrl = data["transitionPlanUrl"] as? String,
              let prerequisiteString = data["prerequisiteString"] as? String,
              let createdAt = data["createdAt"] as? Timestamp
        else {
            print("Invalid post fetch conversion")
            return nil
        }

        let course = Course(id: id, number: number, subject: subject, name: name, title: title, description: description, credits: credits, rubricsUrl: rubricsUrl, level: level, transitionPlanUrl: transitionPlanUrl, prerequisiteString: prerequisiteString, createdAt: createdAt.dateValue())
        return course
    }
Now, let’s add some methods to the CourseStore class:
 // Refresh the view when the view appears
func refreshView(){
    self.courseList.removeAll()
    self.getAllCourses { courses, error in
        if let error = error {
            // handle error
      return
     }
        self.courseList.append(contentsOf: courses!)
    }
}

 // Get all courses from the database
private func getAllCourses(completion: @escaping ([Course]?, Error?) -> Void) {
    self.ref?.getDocuments { (snapshot, error) in
        guard error == nil else {
            completion(nil, error)
            return
        }

        let posts: [Course] = snapshot?.documents.compactMap { document in
            return self.parseCourseDocument(document)
        } ?? []

        completion(posts, nil)
    }
}
We use @Published property wrapper to make the courseList property observable, which means whenever the courseList property is updated, the view will be updated automatically.
Now, in the CourseListView, we can use the CourseStore to fetch the data from the database and display the data in the view. Let’s open the CourseListView.swift file and add the following code:
struct CoursesListView: View {

 // Create an instance of CourseStore class
 @ObservedObject var store = CourseStore()

 var body: some View {
  // ... code we have written before
  .onAppear {
   store.refreshView() // Call refreshView() method when the view appears
  }
 }
}
That’s it, we have finished implementing the CourseStore class. You can apply the same approach to implement the NewsStore class. All the code for stores is located in the Stores folder.
Implementing authentication
In this section, we will explore how to implement authentication functionalities in GVCourse. We will use Firebase Authentication to implement authentication. If you are not familiar with Firebase Authentication, you can check out the official documentation to learn more about it.
First, let’s create a new folder named Managers and a new Swift file named AuthManager.swift inside the Managers folder. This class will provide methods to handle authentication. Copy and paste the content inside the AuthManager.swift into yours.
I will explain the code snippet above in the following sections:
- The init() method is the initializer of the AuthManager class, we use this method to initialize the Firebase Authentication.
- The signInWithGoogle() method is used to sign in with Google.
- The signInWithEmail() method is used to sign in with email and password.
- The signUpWithEmail() method is used to sign up with email and password.
- The signOut() method is used to sign out.
- The validateSignUp() method is used to validate the sign up form.
Now, let’s build the views for authentication. First, create a file named SignInView.swift and add the following code:
import SwiftUI
import FirebaseAuth

struct SignInView: View {

    @State var email: String = ""
    @State var password: String = ""
    @Binding var showSignUpView: Bool

    var body: some View {
        VStack {
            VStack {
                AuthHeader()
                    .padding(.bottom)

                CustomTextfield(title: "Email", text: $email)
                CustomTextfield(title: "Password", text: $password, isPassword: true)

                HStack {
                    Spacer()
                    Button(action: {}) {
                        Text("Forgot Password?")
                    }
                }
                .padding(.trailing, 24)
                .padding(.bottom, 12)

                CustomButton(text: "Sign in") {
     // Call the signInWithEmail() method when the button is tapped
                    AuthManager.shared.signInWithEmail(email: email, password: password) { error in
                        // TODO: Handle ERROR
                    }
                }

                LabelledDivider(label: "or")

                GoogleSiginBtn(text: "Sign in with Google") {
                    // Call the signInWithGoogle() method when the button is tapped
                    AuthManager.shared.signInWithGoogle(presenting: getRootViewController()) { error in
                        // TODO: Handle ERROR
                    }
                }
            }
            .padding(.top, 52)
            Spacer()
            Button("Don't have an account? Sign up") {
                self.showSignUpView.toggle()
            }
        }
    }
}
As you can see in the code snippet above, we use the AuthManager class to handle the authentication. We use the signInWithEmail() method to sign in with email and password, and we use the signInWithGoogle() method to sign in with Google. We also use the signOut() method to sign out.
Simmilarly, we can use the AuthManager class to handle the authentication in the SignUpView file. All the code for authentication is located in the Views/Auth folder.
With just a few lines of code, we have created a beautiful sign in view. Here is the result:

That is our authenticaion implementation. Now, let’s explore how to navigate between views.
Navigating between Views
SwiftUI provides default navigation functionality and UI components, which makes it easy to navigate between views. However, in this tutorial, we will use a custom tab bar to navigate between views. I want to use a custom tab bar because it is more flexible and customizable, help us to learn more about SwiftUI.
First, let’s create our tab bar view. Create a folder named Navigation and a new Swift file named GVCoursesTabView.swift inside the Navigation folder. We first need to create tabbed items (Home, Courses, Settings) for our tab bar:
import SwiftUI

enum TabbedItems: Int, CaseIterable{
    case home = 0
    case courses
    case settings

    var title: String{
        switch self {
        case .home:
            return "Home"
        case .courses:
            return "All courses"
        case .settings:
            return "Settings"
        }

    }

    var iconName: String{
        switch self {
        case .home:
            return "house.fill"
        case .courses:
            return "book.fill"
        case .settings:
            return "person.fill"
        }
    }
}
Note that we use enum to define the tabbed items, this is a good practice because it makes the code more readable and maintainable. Now, let’s create the tab bar view:
struct GVCoursesTabView: View {

    @State var selectedTab = 0

    @StateObject var newsStore = NewsStore()
    @StateObject var courseStore = CourseStore()
    @StateObject var userStore = UserStore()

    var body: some View {
        ZStack(alignment: .bottom) {
            TabView(selection: $selectedTab) {
                NewsListView().environmentObject(newsStore).tag(0)
                CoursesListView().environmentObject(courseStore).tag(1)
                SettingsView().environmentObject(userStore).tag(2)
            }

            ZStack{
                HStack{
                    ForEach((TabbedItems.allCases), id: \.self){ item in
                        Button{
                            selectedTab = item.rawValue
                        } label: {
                            CustomTabItem(
                                imageName: item.iconName,
                                title: item.title,
                                isActive: (selectedTab == item.rawValue)
                            )
                        }
                    }
                }
                .padding(6)
            }
            .frame(height: 60)
            .background(Color("brandSecondary").opacity(0.5))
            .cornerRadius(10)
            .padding(.horizontal, 26)
        }.ignoresSafeArea(.keyboard, edges: .bottom)
    }
}
As you can see in the code snippet above, we use TabView to create the tab bar view. We also use CustomTabItem to create the tab bar item. Now, let’s add the code for out CustomTabItem:
extension GVCoursesTabView {
    func CustomTabItem(imageName: String, title: String, isActive: Bool) -> some View {
        HStack(spacing: 10) {
            Spacer()
            Image(systemName: imageName)
                .resizable()
                .renderingMode(.template)
                .foregroundColor(.white)
                .frame(width: 20, height: 20)
            if isActive {
                Text(title)
                    .font(.system(size: 14))
                    .foregroundColor(.white)
            }
            Spacer()
        }
        .frame(width: isActive ? nil : 50, height: 50)
        .background(isActive ? Color("brandPrimary").opacity(0.7) : .clear)
        .cornerRadius(5)
    }
}
Now, inside the GVCoursesApp.swift file, we can use the GVCoursesTabView as the root view if the user is signed in:
@main
struct GVCoursesApp: App {
    @AppStorage("signIn") var isSignIn = false
    @State private var showSignUpView = false

    @UIApplicationDelegateAdaptor(AppDelegate.self) var delegate
    var body: some Scene {
        WindowGroup {
            if !isSignIn {
                if !showSignUpView {
                    SignInView(showSignUpView: $showSignUpView).withErrorHandling()
                } else {
                    SignUpView(isPresented: $showSignUpView).withErrorHandling()
                }
            } else {
    // Use GVCoursesTabView as the root view if the user is signed in
                GVCoursesTabView()
                    .navigationBarHidden(true)
                    .navigationBarBackButtonHidden(true)
            }
        }
    }
}
And here is the result of our beautiful custom tab bar:

That’s it, we have finished implementing the navigation between views! Now let’s explore the search functionality.
Implementing search
In this section, we will explore how to implement search functionality in GVCourse, so that users can search for courses they need easily. First, let’s create a new folder named Searching and a new Swift file named GVCoursesSearchBar.swift inside the Searching folder. This file contains the code for the search bar’s UI. You can copy code from here
Next, we need to implement the search functionality. Let’s open the CourseStore.swift file and add two more properties to the CourseStore class:
@Published var searchTerm: String = ""

var filteredCourses: [Course] {
        guard !searchTerm.isEmpty else { return courseList }
        return courseList.filter { $0.name!.localizedCaseInsensitiveContains(searchTerm)
            || $0.title!.localizedCaseInsensitiveContains(searchTerm) }
    }
As you can see in the code snippet above, we use the searchTerm property to store the search term, and we use the filteredCourses property to store the filtered courses.
Now, let’s open the CoursesListView.swift file and replace the fake data with the following code:
@EnvironmentObject var store: CourseStore
Instead of looping through the fake data, we will loop through the filteredCourses property:
List {
    ForEach(store.filteredCourses) {c in
        ZStack(alignment:.leading) {
            NavigationLink(destination: CourseDetailsView(course: c)) {
                EmptyView()
            }
            .opacity(0)
            CourseRowView(name: c.name!, credits: c.credits!, title: c.title!)
            }
    }
}
See also
Here is a list of resources that I found helpful when learning SwiftUI, building the GVCourse app, and writing this tutorial:
- SwiftUI Tutorials
- SwiftUI Documentation
- SwiftUI by Example
- Building lists and navigation in SwiftUI
- Custom Tab Bar in SwiftUI
- SwiftUI folder structure as RN developer
- SwiftUI Google Sign In
- SearchBar in SwiftUI
- SwiftUI vs UIKit
Conclusion
Let’s discuss further about the advantages and disadvantages of SwiftUI and alternative approaches.
Performance
SwiftUI uses a technologies called Metal to render the UI, which makes the UI more performant. The most important thing is that SwiftUI’s rendering engine efficiently updates only the parts of the UI that have changed, reducing unnecessary work. This is a huge improvement over UIKit, which being older, has a lot of legacy code that is not optimized for performance.
Third party components
Because SwiftUI is quite new, there are not many third party components available compared to UIKit. However, it is still growing rapidly.
Use cases
SwiftUI is recommended for:
-
New projects that target the latest iOS and macOS versions.
-
Prototyping and quickly creating user interfaces.
-
Cross-platform development, including Apple Watch and Apple TV.
-
Developers who prefer a declarative and Swift-based approach.
Alternative approaches
SwiftUIX is an open source library of extensions to the standard SwiftUI library. It provides developers with a set of components to help them build apps faster. It is a great alternative approach to implement the same functionality.
Related platform features
SwiftUI is a framework that provides views, controls, and layout structures for declaring your app’s user interface. The framework provides event handlers for delivering taps, gestures, and other types of input to your app. SwiftUI also provides APIs for managing your app’s user interface in different ways, such as adapting the layout to different platforms, displaying different UI elements based on the size of the screen, and localizing your app’s interface into different languages.
In this tutorial, we have explored how to implement the GVCourse app using SwiftUI. We have explored the basic concepts in SwiftUI, how to build the views, how to build the models, how to interact with the database, how to implement authentication, how to navigate between views, and how to implement search functionality. If you have any questions, feel free to reach out to me at my email. Thank you for reading!
Source code can be found here.
License
This project is licensed under the MIT License - see the LICENSE file for details.